A doorless walk-in shower works in bathrooms as small as 36″×36″—you don’t need a massive space to pull it off. What you do need is the right layout, proper drainage slope, and a showerhead position that keeps water where it belongs. Exploring different doorless walk in shower ideas can result in a space that is cleaner to maintain, easier to access, and genuinely feels like a spa every single morning.
The shift toward doorless showers isn’t just a trend – it’s a practical one. No door tracks collecting soap scum. No hinges to re-seal. No curtain liner to replace. Here’s how to design one that works beautifully.
Why More People Are Going Doorless
- No mold-prone door seals or tracks to scrub – cleaning drops to a wipe-down
- Better accessibility – no threshold to step over, ideal for aging-in-place design
- Makes small bathrooms feel larger by removing visual barriers
- Rain-head and multi-function showers look far more dramatic without glass cutting the sightline
- Resale value: open walk-in showers consistently appeal to buyers
Layout Options: Which One Fits Your Bathroom?
|
Layout Type |
How It Works |
Min. Space Needed |
Pros |
Cons |
|
Corner Entry |
Two walls form the shower; entry is the open corner |
36″×36″ |
Space-efficient, easy to retrofit |
Can feel tight |
|
Alcove (3 walls) |
Three walls surround the shower, one open side |
36″ wide |
Very contained, easy to tile |
Needs good ventilation |
|
Wet Room |
Entire bathroom floor is waterproofed; shower has no defined barrier |
Whole bathroom |
Ultra-modern, very accessible |
Expensive to waterproof |
|
Open-Wall / Partial Glass |
One partial glass panel on the open side contains splash |
48″+ width |
Balance of open feel + containment |
Glass panel to clean |
|
Peninsula Layout |
Shower protrudes from one wall, open on two sides |
Large bathrooms |
Very spa-like, dramatic |
Requires excellent ventilation |
Containing Water Without a Door
This is the question everyone asks. The answer comes down to three things working together – not just one:
- Floor slope: The floor must slope a minimum of 1/4 inch per foot toward the drain. Linear drains placed at the shower entry are the most effective at stopping water migration
- Showerhead position: Angle the spray toward the back wall or overhead – never toward the open entry. Rain heads mounted directly overhead keep water in a tight vertical column
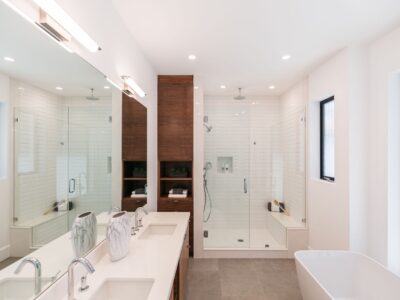
- Partial glass panel: A 20″-24″ fixed glass panel at the entry side of the shower catches the vast majority of splash without enclosing the space. It’s the best of both worlds
Tile Ideas That Define the Shower Space
Without a door, tile becomes your primary design tool for signaling where the shower begins and ends.
- Floor-to-ceiling feature tile on the back shower wall: Creates a strong visual frame that reads as a defined zone
- Contrasting floor tile: Use a different tile inside the shower footprint vs. the rest of the bathroom floor – the line does the work a curb used to do
- Large-format tiles (24″×48″ or bigger): Fewer grout lines = easier cleaning and a more seamless, modern look
- Pebble or textured tile on the shower floor: Provides grip and an organic contrast to smooth wall tile
Shower Head Choices for Doorless Designs
|
Shower Head Type |
Best For |
Water Containment |
Notes |
|
Ceiling rain head |
Large doorless showers, wet rooms |
Excellent (vertical fall) |
Most popular in open showers – dramatic look |
|
Wall-mounted rain arm |
Medium showers with 3-wall alcove |
Good if angled correctly |
Easier to retrofit than ceiling mount |
|
Multi-function body panel |
Larger wet rooms |
Needs careful angle |
Pairs well with rain head |
|
Handheld on slide bar |
Any size, especially accessibility |
Requires disciplined use |
Great as secondary to a rain head |
Small Bathroom Doorless Shower Tips
A small bathroom doesn’t have to mean a cramped shower. These tricks make compact doorless showers feel considered rather than compromised:
- Use the same tile on the shower floor and bathroom floor to visually expand the space – just change the grout color
- Choose a recessed niche over a caddy – it keeps the lines clean and doesn’t add visual clutter
- Go frameless on any glass panel – even a small panel looks far better without the thick aluminum frame
- A curbless entry (floor flush with shower floor) makes a small bathroom look significantly larger
- Keep the wall tile simple – save any pattern for the shower floor or a single accent wall
Material Comparison
|
Material |
Look |
Durability |
Maintenance |
Avg Cost (per sq ft, installed) |
|
Ceramic tile |
Traditional, wide variety |
Good |
Grout needs sealing annually |
$10-$25 |
|
Porcelain (large format) |
Clean, modern |
Excellent |
Low – fewer grout lines |
$15-$40 |
|
Natural stone (marble/slate) |
Luxurious, unique |
High with sealing |
Needs regular sealing |
$30-$80+ |
|
Engineered stone panels |
Seamless, modern |
Very good |
Very low – no grout |
$25-$60 |
|
Poured concrete |
Good with sealing |
Requires professional sealing |
$30-$70 |
Final Thought
There’s something genuinely different about stepping into a doorless shower every morning. It doesn’t feel like a compromise – it feels like an upgrade. The shower you’ll actually enjoy, not just use. Get the drainage right, position the showerhead properly, and the rest is just picking materials you love.